Monday 18 November 2013

Design No.11 Started

One question that I pondered at this point was the choice of thread colour to use to do the transfer tacking of the design. 


I could have 
  • matched the the thread to the colour of the piece to be stitched so it would blend
  • used the same colour thread as the fabric which could make it hard to see
  • used a contrast colour that could be removed if I wanted to as I stitched
I like to think common sense won out and I went with a contrast thread.


It wasn't so bad to do. Sure it took a little while but I found removing the tissue paper less fun, especially where little bits got caught. 

I removed all the tissue paper at once.
I have since learnt that you could remove the tissue paper as you progress with the stitching. This would protect the fabric and transfer tacking as you complete the design. I must try it sometime but to be honest as doing all the Stem Stitch Scrolls was first up, it wouldn't have made much difference.


Then it was time to start stitching and this is where I got up to before life intervened and my Intermediate Crewel Class started.

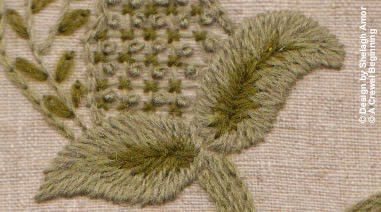
I didn't like the Long and Short Stitch in the Blue Leaf, that was going to have to come out for sure. It looks a bit like Block Shading to me - no long and longer happening here! 

I did have some 'thread encounters' when bits of the tacking thread seemed to get stubbornly intertwined into the crewel wool and made life a little difficult, especially if it involved a knot. 

I wish I had read Mary Corbet's Needlenthread : Transferring an Embroidery Pattern using Tracing Paper before I started as I could only agree with her conclusions:
  • think very carefully about the colour thread you are going to use, it turns out not to be as invisible as you first thought
  • Mary recommends no knots - I did knot as I went, my mistake and I wouldn't do it again
  • remove the tracing paper carefully, it comes away readily enough but so might your stitches
  • have tweezers handy, you will need them to tease out those last bits of fluffy tracing paper or stubborn bits of thread

This technique does a good job transferring your design accurately, I would do it again.

It will be a while before Design No. 11 makes another appearance, all the while that Blue Leaf will bug me!

Monday 11 November 2013

Design No. 11 Selected

I was successful in my application to do the EGV Intermediate Crewel Class but there was a little bit of time to fill before it started so I selected another design from Shelagh Amor's book - Crewel Embroidery - A Practical Guide.

I had admired this design from the moment I saw it. All those gorgeous scrolling curves and such a variety of stitches to work.


There were some other things I wanted to try as well:
  • using another fabric not the usual linen twill
  • working a larger design on a frame (fabric measurement is 50cm x 40cm)
  • trying out a different transfer method, this time tacking the design through tissue paper.


Fabric
I had recently bought some twill fabric at a Craft Fair in two colours. This fabric was a fairly heavyweight linen/cotton mix and was quite sturdy. I did ask around about a good test to see if a fabric can handle Crewel Embroidery and testing French Knots with 2 strands of Crewel wool in a Size 3 needle seemed a reasonable trial. My fabric choice was fine.

I chose the natural stone colour to use but did decide to back the fabric with some lightweight interfacing. I had an idea at the time of what the completed piece might turn into so wanted to cover all bases.

Design Transfer


The design was then traced onto tissue paper directly from the A4 page in the book. This is a particularly good feature about this book, the designs are life size and instantly usable. No mucking around with photocopiers or trying to re-size the patterns bigger or smaller. Everything is ready to use.


Framing Up
By now I had read about Slate Frames and how Crewel Embroidery is traditionally done on such frames. Slate Frames are different from Tapestry Frames in that the side bars have holes spaced along them to enable the fabric tension to be controlled effectively.

Slate Frame side bar and cotter pin

However Slate Frames aren't as readily available as Tapestry Frames and can be relatively expensive so I settled for buying a Tapestry Frame large enough to trace the complete design. 


I imagine you could roll the fabric around the end rollers of a Tapestry Frame if you had an even larger design but that would entail lots of re-lacing and re-tightening of screws and wingnuts. Now that would be a distraction if you were well into the stitching!

But for me and and as I wanted to give working with a larger frame a try, I was very happy with my Tapestry Frame set up - so far, so good.

Wednesday 6 November 2013

Majestie Finished

Having finished my Beginner's Crewel Class project I turned my attention back to my Majestie project, confident now that I would be able to complete it.

You can read about the Majestie project in previous posts:


And this proved to be the case.


 My observations from doing this design from the A-Z of Crewel Embroidery were:
  • the instructions were at times quite difficult to follow with my level of experience as some of the stitches that appeared in the sample picture and had threads allocated to them in the Embroidery Key didn't have specific instructions
  • I tested using one thread or two but would have appreciated knowing what the designer used - I ended up using two because I thought it gave the best coverage
  • there were threads that I substituted when I couldn't get the Cascade House mohair. I was recommended Gumnut Daisies and while they did produce a different finish I don't think changed the impact of the overal design. The Gumnut Daisies thread was absolutely lovely to use and I would use them again.


I completed the design on a relatively small piece of the linen twill so I thought I would be limited in what I might choose to do with this piece.

It did take me a few months, but in time for my Mum's birthday in mid-November 2011 I had solved my dilemma. 

With twisted cord found at a Craft Fair and perfectly matching sample fabric found at the EGV's Paddy's Market, Majestie became the centrepiece of a cushion. 

Much loved and still holding pride of place on my Mum's favourite chair to this day - I couldn't be happier!


Stitching dimensions: Width 14.5 cm x Height 20 cm
Cushion Finishing dimensions: Width 34 cm x Height 34 cm
Ground Fabric: Linen Twill
Thread: 
Appletons Crewel Wool Flame Red 206, Grass Green 255, Grey Green 354, 357
Watercolours by Caron 021 Peach Melba, 093 Painted Desert
Cascade House Mohair Substitutions: Cascade House Shaded Crewel Wool Col 1790 and Gumnut Yarns Daisies 869, 829, 039

Design Source: Majestie by Avril Ambrose-De Havilland in Crewel A-Z by Country Bumpkin

Stitches used:
  • Split Stitch
  • Satin Stitch
  • Whipped Chain Stitch
  • French Knots
  • Straight Stitch
  • Long and Short Stitch
  • Blanket Stitch
  • Raised Stem Stitch
  • Chain Stitch
  • Cross Stitch Couching

Friday 1 November 2013

Beginner's Crewel - Lacing and Finished

My plans for my Beginner's Crewel design was to mount the piece which meant it could remain a sampler or down the track I could frame it.

The first task was to decide on the size I wanted the final piece to be. To be honest I should have thought of this beforehand and made sure I cut my ground fabric to the right size. But I didn't so I worked with what I had.

I was able to have a 3.5 cm distance from the farthest points from the embroidery on three sides but at the top only 2.5cm. The extra 1 cm depth at the bottom of the design is regular to framing I believe. There is a little bit of math required to get those measurements just right but nothing too scary.


It is also important for Lacing that you have enough fabric on the reverse so I had to balance that as well. Fortunately I could use the waste fabric I had used to set up the linen twill on the frame. I ended up sewing a bit extra onto the top and bottom as well. This meant the reverse had 2.5cm on the top and bottom and 5 cm on the sides to lace with - just enough!

Next, cut some foam core to size:


And for a softer, plumper look add some fine wadding (I used Pellon) and glue the two together:


These were the instructions I received in the Beginner's Crewel Class. I have since learnt that there are lots of options and that personal preference plays a big part in deciding what materials are used.

Then I measured, measured and measured again. And then I measured a bit more, just to be safe.

I put the first pin in the side of foam core and just like when Blocking went from side to side to get some tension in the fabric. I pulled so hard at one point that the pin crushed the lip of the foam core and damaged it. So that was a good lesson to learn about being a little more patient and to work the tension – this is actually quite easy to do as the pins can be removed, you tug a little more and bit by bit it all evens out. Pretty neat actually. Wish I had of known that at the start. 

You can also see that I have cut out the corners of the piece in order to mitre them or at least to handle the bulkiness of the fabric at the corners.

Once all the pins are in and you are happy with it then it is time to lace.


I worked from top to bottom and then side to side.

The tip I was given was not to unwind metres of thread, rather lace some then pull the additional thread through. I hope I get better at this as I did manage to get a little tangled up at times with the pins and the thread.

And then it is finished:

Stitching dimensions: Width 14cm x Height 19cm
Finishing dimensions: Width 21cm x Height 25.5cm
Ground Fabric: Linen Twill
Thread: Appletons Crewel Wool Drab Green 333, 334, 335, 337 and Rose Pink 751, 752, 753, 754, 755
Design Source: Marj Kavanagh, EGV Beginner's Crewel Class

Stitches used:
  • Stem Stitch
  • Coral Knots
  • Closed Fly Stitch
  • Split Stitch
  • Long ans Short Stitch
  • Chain Stitch
  • Seeding
  • Squared Filling Stitch
  • Couching
  • Buttonhole Stitch
  • French Knots
  • Whipped Spider Stitch

Extra instruction on Lacing can be found at:

Monday 28 October 2013

Beginner's Crewel - Blocking

I have been a little bit wary of the task called 'Blocking' so it was wonderful when Lyndsay from the Embroiderer's Guild decided to demonstrate this for us at one of our New Member sessions. And use my piece as the sample!

The purpose of Blocking is to ensure the ground fabric is wrinkle free and ready to be made up. It also helps the ground fabric and threads 'settle' into the design and improves its general appearance. 

Lyndsay made this look so practical and straightforward, an excellent demonstration. As with most things, having the right tools is half the battle. So, in preparation Lyndsay brought in:

  • a piece of board (this can be anything as long as it is soft enough to hammer the pins into)
  • some white plastic bags - not supermarket plastic but a bit heavier. (If you only have coloured plastic bags then turn them inside out. The main thing is not to have anything where you think the colour might run)
  • old pillowcases (or layers of fabric) - your local thrift or op shop being a great source for these. Again you want to make sure the fabric is white or colourfast so you don’t risk staining your own stitching
  • a hammer
  • plenty of Push Pins 
  • spray bottle of cold water
On the board, lay the white plastic bags then a pillowcase, then:

  • lay the piece of stitching to be blocked face down onto the pillowcase
  • hammer a pin into the centre of one side
  • repeat doing this on each of the other three sides, stretching fully as you go
  • continue to hammer in Push Pins, moving from side to side and continuing to stretch out the fabric as you go
  • expect the Push Pins to be about 1 inch apart to ensure an even stretch

If you feel the need to measure and block to a square then you can get that fussy but for the piece being blocked this was not necessary:
  • using the spray bottle and cold water, spray over all the piece and ensure it is wet through. It wasn’t dripping and we weren’t in a wet area so no need to literally flood the piece
  • cover with a second pillow case and then leave it to dry


Extra information:
  • All four edges of the stitching were reinforced beforehand with some waste cotton drill securely attached to the linen twill. It made the edges nice and sturdy and meant we were putting holes into that rather than the linen twill
  • The cold water also removed all last remnants of the blue transfer pen used to transfer the design (another very good reason not to use hot water)
  • Lyndsay was very careful to ensure nothing she used would cause any colour to run – there was even some discussion of having to wash threads before they are stitched if you don’t know they are colourfast but no-one had actually ever done this and certainly not with Appletons
  • You can remove a Push Pin and re-stretch to get the piece even if you wish
  • You can block the same piece more than once if you need to


Blocking removes the need to iron Crewel Embroidery but if you feel you must do this always face the Crewel Embroidery face down into a towel so as not to flatten all that work you have just done.

Wednesday 23 October 2013

Beginner's Crewel - Lesson Two

Two weeks later and I am back at Embroidery House for Lesson Two of my Beginner's Crewel Class. 

To get this far I practised on my doodle cloth if I was unsure of a stitch. This did involve re-visiting one or two stitch techniques so I used the two Crewel Embroidery books I had already bought as my sources of information. I found the books to be great memory joggers of what Marj had taught us.


I did struggle getting the Coral Knot Stitch to come up as well as I would like, it is a stitch that still challenges me to this day. I think it is my 'nemesis' stitch - the one that if it can go wrong, it will go wrong!

Anyway, I stitched as much of the design as I could. I did redo some parts I had done in Lesson One and became quite proficient in 'reverse stitching'. I have since learnt that this term is for fussy stitcher's like me who will undo, then redo their work to get it just right.


In Lesson Two Marj then taught us:
  • Chain Stitch
  • Seeding
  • Squared Filling Stitch
  • Couching
  • Buttonhole Stitch
  • French Knots
  • Whipped Spider Stitch

During the lesson and over the next 10 days I thoroughly enjoyed stitching the design.


Thank you to Marj for a lovely design, expert tuition and the warm and friendly classroom. 

If you recall though, that is not all we were to be taught in the Beginner's Crewel Class. So while the stitching may be finished the piece is not. It still needed to be 'Blocked' and 'Laced'. 

And while we did receive instruction on doing these tasks we didn't get time to see them demonstrated so I was still unsure of how to do them. So next, I set about looking for other opportunities at the EGV* to learn about them.

* EGV = Embroiderer's Guild of Victoria (http://www.embroiderersguildvic.org/)

Friday 18 October 2013

Beginner's Crewel - Lesson One

Arriving at Embroidery House for my first class, Beginner's Crewel, I was surprised and delighted to meet 10 other students all as eager as myself to get started. Our teacher Marj was ready and waiting to get us all going with the first task to get the base design transferred onto our fabric.

By now I had bought a 'blue' transfer pen (the type that could be removed with cold water) and used a light box that was available to trace the design lines from the original template supplied.

My original template was much used along the way as you can see. But first up, I did redraw the original design lines with a heavier black texta to make it easier to see for tracing. Some wayward pen strokes suggest I might have rushed this a bit!


But regardless of how heavy handed it looks on the template, using the blue transfer pen provided enough direction for stitching proving to me the thick bold lines I traced on the Majestie design with a regular HB lead pencil are simply not necessary (sample upper left corner).


As we sat down to learn our first stitch, I did notice all the ways students had interpreted the Requirements List. Some used a hoop, others stretcher bars with drawing pins or like me, used a frame. I had sourced a piece of linen twill for my background or rather 'ground' fabric as it is known, but others had cotton drill or evenweave linen. Did these things matter? Well actually they did.

For one, using a frame meant I needed an extra hour to get set up than those with a hoop. Stretcher bars were an efficient option as well. And the student who had a beautiful piece of evenweave linen found it too 'open' to handle the density of the wool thread with the fabric starting to separate and break as he progressed. Most upsetting.


Demonstrated by Marj were:
  • Stem Stitch
  • Coral Knots
  • Fly Stitch
  • Split Stitch
  • Long and Short Stitch
Being able to do these stitches meant we would be able to complete about half the design and what wasn't done in the first lesson was homework, to be completed by the next class in two weeks.

And you know what - I now love homework!

Tuesday 15 October 2013

A Quick Grip Clamp?

So when you read down the Requirements List for my Beginner's Crewel Class in my previous post what did you make of the item called a "Quickgrip Clamp"?

Now that I know what this item is it all makes good sense but when I first read it I have to admit to being a little bamboozled. I did ask around and it seemed all those that answered were nodding wisely at me and agreeing about the importance of such a tool. 

It turns out that Fine Art Embroidery takes a far bit of hardware and I have since accumulated a number of pieces of equipment you would think more closely related to carpentry than to a needle and thread. So off to Bunnings, our local hardware store I went with Quickgrip Clamps the purchase from my first visit.


And why do you need them?

The next very important Crewel Embroidery rule is that having two hands free is necessary to complete some of the stitches, in fact most of them. So the Quickgrip Clamps allow you to attach your embroidery frame or hoop to a stable object so you don't have to hold it.

So very simple, so very important.


Here is one of my frames attached to a towel rail we don't use any more. Turns out a towel rail is not a bad support for an embroidery frame.

And once you have your Quickgrip Clamps they suddenly become useful for all sorts of jobs. For example, when using a sharp blade to cut matt board or foam core I find it easier to get a straight edge if I keep everything stable with Quickgrip Clamps - especially as I don't want to repeat the slashed finger injury of 1994, I still have the scar to remind me!


So useful are Quickgrip Clamps that I think that having a pair should be a Crewel Embroidery rule!

Thursday 10 October 2013

Beginner's Crewel at the EGV

Once you know about the Embroiderer's Guild of Victoria (EGV) website then it is a simple matter of looking at the Education section to find out what classes are coming up. When you join the EGV then the monthly magazine, Threadlines, is also an excellent way to keep up to date.


This is how the Beginner's Crewel class was described:

'The aim of this class is to teach basic stitches for crewel embroidery,
show you how to frame up and block your work, and finally how
to lace your work in preparation for framing. This class is for both
 beginners and those who wish to refresh their skills.'

The class was to run  over two days with a two week gap in between. We were to get together from 10am until 3pm at Embroidery House and would be having a break for lunch.

This is the Beginner's Class design.


It couldn't have been more perfect for me. And actually lots of others thought so too with the first class booked out and a second having to be scheduled. 

So what did I need to do a Beginner's Class in Crewel?

Once enrolled the Class Requirements List arrived in plenty of time to gather up what was needed. Some things were new and surprising to me.

I needed:
  • Embroidery frame
  • Crewel needles size 3 & 4
  • Large darning needle
  • Fine marking pen, water erasable
  • Tracing paper
  • Pencil 0.5mm HB
  • Sharp scissors
  • Quickgrip Clamp
  • Lacing thread 
  • Fabric - natural coloured linen or cotton twill
  • Appletons Crewel wool

I went out again to 'purchase with purpose' my Appleton's Crewel threads, 5 shades of a pink and and 4 shades of a green. My favourite kind of embroidery thread shopping.


I will always remember with delight doing this shopping at The Needlepoint in East Malvern, which sadly is no longer open. Thank you to Noelene who was always so very helpful.


Monday 7 October 2013

Design No.1 Finished

Having received so much encouragement and instruction there was nothing left to do but have a go at long and short stitch. And I think that I did okay.


I was a little surprised how blended the first and second shade of green were. While you can recognise the three rows of stitching you can't distinguish the three greens so easily. 
I must mention that I did substitute the Appletons colours from the original instructions and used shades 342, 343 and 346. I think using 344 rather than 343 would probably have been a better choice in this leaf size. 


So, some additional Crewel Embroidery rules:
  • take care with colour selection, be aware there are up to 9 shades (or values) of a single colour with Appletons Crewel wools
  • if you strictly alternate stitch lengths when doing long and short stitch then you will probably end up with the same ladder effect as I did below. It is fine but as you get more experience you develop the skill to blend your long and longer stitches and no more ladder look.


Don't you just love being a beginner and starting something new - such enthusiasm to get a project finished. When I look back now at Design No.1 I find that from start to finish was only seven days. No risk of a UFO* here!


Stitching dimensions: Width 10cm x Height 11 cm
Finishing dimensions: Width 12cm x Height 14.5 cm
Fabric: Linen
Thread: Appletons Crewel Wool Mid Olive Green 342, 343, 346
Design Source: Shelagh Amor Design No. 1, Crewel Embroidery - A Practical Guide

*UFO: UnFinished Object or PHD if you prefer, Project Half Done.

Friday 4 October 2013

An invitation I couldn't resist!

It turned out to be a very productive time, early 2011. I am still not sure why or how, but an email turned up one day inviting me to join an online embroidery forum called Stitchaholics. 

Using social media software supplied by NING, Stitchaholics was created by Caroline Sumeray and has since maintained a steady and loyal following. For me, I suddenly found myself part of a stitching fraternity frequented by many encouraging and supportive online friends. The common language of embroidery transcending language and borders.


I joined the Crewel and Jacobean Embroidery Group and was encouraged to provide photos of my efforts. When these were posted I was provided with constructive and positive feedback.

And why wouldn't I pay attention to the advice given when you find out one of your online mentors, RaeleneV, had recently finished her own magnificent crewel worked piano stool. And the primary stitch? You guessed it, long and short stitch!

Piano Stool designed and stitched by RaeleneV


It was actually suggested to me by an experienced stitcher that I should wait until I was in a classroom before I tackled long and short stitch. To make sure I got the right instruction from day one. I think this was very good advice. But as it turned out, the classroom was online. 

In response to my obvious apprehension RaeleneV, posted the following step by step guide to producing long and short stitch leaves for Design No. 1.


You can only reach the same conclusions that I did:
  • the stitch really should be called Long and Longer Stitch
  • those instructional line drawings we often see do give you a sense of the technique but worked thread shows far more
  • that RaeleneV knows what she is talking about and cared enough to share it
  • that I can learn online
Note: for those interested in joining Stitchaholics please leave a Comment 

Monday 30 September 2013

Design No. 1 Started

So what would be the right size project to get started on?

Having borrowed Crewel Embroidery - A Practical Guide from the *EGV Library and having the author available for extra help it seemed silly not to go to the first project in the book called quite simply 'Design No.1".

*EGV = Embroiderers Guild of Victoria : http://www.embroiderersguildvic.org/


There are very clear instructions on the requirements you need for the project and I was very keen to get going. I used:
  • a piece of tightly woven linen fabric
  • size 3 & 4 Crewel needles
  • Appletons Crewel wool in 3 shades of the one colour
  • a wooden hoop with the inner ring bound
  • Embroidery scissors
  • tracing paper
  • a transfer pen, water eraseable
I don't know about you but I love nothing more than wandering into an Embroidery Supply Shop and looking at all the glorious threads. Inevitably I buy something because I can't resist and my stash gets bigger with all the best of intentions. 

To purchase threads with purpose is an even better experience especially when they are the last remaining requirement needed to get a new project started. 

As you can imagine there was no waiting around until next months Guidance Group now. Once the the design was traced and transferred I was on my way following the instructions carefully.

This picture is about the half-way point in Design No. 1 - next I needed to tackle Long and Short Stitch. And being the Harry Potter fan that I am, it seemed to me that when you mention 'Long and Short Stitch' you might as well be saying 'Voldemort' at the top of your voice, such is the reaction of many an experienced stitcher!


Very important Crewel Embroidery rules I had learned at this stage:
  • Always stitch the furthest away element first and then work your way forward
  • Woollen thread should be cut into lengths of no more than 18 inches
  • Use a size 3 needle for two threads and a size 4 for one thread
  • You need a sharp pair of Embroidery scissors

If you would like to know more about Crewel Embroidery - A Practical Guide it has been reviewed by Mary Corbet on Needle 'n' Thread.

Friday 27 September 2013

What is a 'Doodle Cloth'?

I went to my first Guidance Group Meeting at the Embroiderers Guild of Victoria in February 2011. Known as 'Shelagh Amor's Group', some 20 or more delightful ladies turn up on the third Wednesday of each month to 'chat & stitch'. I have to admit some months are more 'chat' than 'stitch'!

This Guidance Group has been running for over forty years and has seen many members come and go. The one constant of course, has been Shelagh.


"I joined the Embroiderers Guild in 1968 after seeing an exhibition of members’ work. I was inspired by everything I saw at that exhibition. The work of some of the early members such as Phyllis Strangward, Ethel Oates, Lesley Uren, Edna Wark and Merle Whittle was magnificent. From then on, a needle was never far from my hand. The Embroiderers Guild, Victoria has been a means of learning many embroidery techniques but above all it has lead to many firm friendships." Shelagh Amor http://www.embroiderersguildvic.org/

As we settled in on that first evening Shelagh asked me what I planned to do and out came a tumble of words about the Majestie piece I had started. After listening patiently Shelagh just asked "Do you have a doodle cloth?". Well that stopped me in my tracks, "A what?" was my reply.

Before you know it, I had a piece of inexpensive calico sitting in a 6" inch wooden hoop as tight as a drum. A simple curved line was drawn and on it Stem Stitch was started. The hoop was handed back to me with the needle ready to do the next stitch. My turn to try out Stem Stitch on my 'doodle cloth'. It actually takes no more than that to start Crewel Embroidery.


I have retired that doodle cloth now as it is pretty much full but I have just prepared another for a friend about to try out some Trellis work. So a number of things became apparent to me that night:
  • that I wanted to be able to stitch Crewel Embroidery like Shelagh Amor
  • I should start with something simpler than Majestie as my first piece
  • and never be without a doodle cloth!

Footstool designed and stitched by Shelagh Amor

Inspired, encouraged and taught by one very fabulous lady, thank you Shelagh.

Tuesday 24 September 2013

In the Meantime

During the same holiday break I also decided to find out more about Embroidery in my home town. While I knew of a number of retail shops I didn't know much more. You can imagine how delighted I was to find out about the Embroiderer's Guild of Victoria (EGV). Thank you Google!

I joined the EGV in January 2011. 


While the EGV has turned out to be more inspirational than I could ever have imagined the first five things that I benefited from were:
  1. Guidance Groups
    There were so many Guidance Groups to choose from but one selected me - Shelagh Amor's Group who meet on the 3rd Wednesday of the month in the evening. Why was this so perfect? As I am a full time worker the evening timeslot was great but even better was meeting Shelagh Amor, author of Crewel Embroidery - A Practical Guide.

  2. New Members Group
    On the second Saturday of the month for all of 2011, I visited Embroidery House and learned all about the EGV and how it operated. In addition, each month a guest speaker would introduce an Embroidery technique to new members. I saw so many new things to try.
  3. Classes
    Scheduled for March 2011, I enrolled in my first Class, Beginner's Crewel (over 2 separate days). I also had my eye on the Intermediate Crewel Class that was to start in July 2011 which would be scheduled over 3 months.
  4. Library
    Books, books and more books on Embroidery. I could borrow four at a time for a month as a member. So I did, every month until I had read all the books on the Crewel shelf. 
  5. Threadlines Magazine
    At the start of each month, the EGV's Threadlines magazine arrives in my mailbox. It is full of updates and information and most importantly the upcoming Class schedule.


I felt like I had hit the Embroidery jackpot and the truth is I had.